Render Windows Controls fully (with special fade effects) in Windows Vista
Introduction
This article is about getting controls found in Windows Vista to make use of the new Windows Vista user interface. Included in the project are some components (Commandlinks, ImageButton, SplitButton) that work just like the Windows Vista themed controls.
The article would aim to achieve most of the interface effects (like the fade-in/out) effects seen throughout Windows Vista.
Background
Most users of Windows Vista would probably notice the new user interface. Each control is a step nicer compared to that of Windows XP, and it comes complete with nice little fade effects. However, Microsoft Visual Studio does not support the full Vista themes by default. Although Visual Studio 2005 attempts to address the visual styles problem, it still does not allow controls to achieve all the visual effects seen throughout Windows Vista.
This article covers on:
- Getting the fade effects on some common controls (
Buttons,Checkboxes,Radiobuttons,Textboxes,Comboboxes) - Getting images working on
Buttons, and preserving fade-effects - Getting the fade effects on
Toolbars - Getting the Windows Vista theming on
MainMenus andContextMenus - Getting
CommandLinks andSplitButtons - Getting different colored
Progressbars - Getting the explorer-like interface for
ListBoxes andTreeViews
It utilizes the user32.dll SendMessage() function, as well as the uxtheme.dll setwindowtheme() function for certain controls in order to render some of the controls to the desired level.
Prerequisites
You will need the following things to complete this tutorial:
- Windows Vista
- .NET framework 2.0 (already preinstalled in Windows Vista)
Some other useful things (optional):
Common controls
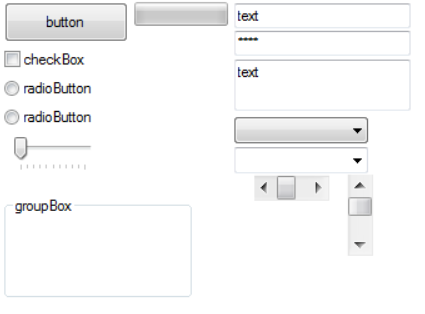
Most of the controls are already ready for the Windows Vista theming. I’m sure you have heard of EnableVisualStyles() right? EnableVisualStyles() is usually called to allow theme-aware controls to gain the user interface theme. While Visual Studio 2005 already has this done, Visual Studio 2003 does not have this on by default. If you want to enable theming for common controls, you can view Heath Steward’s article on Windows XP Visual Styles for Windows Forms.
EnableVisualStyles() affects the following controls:
TextBoxRichTextBoxHScrollBarVScrollBarProgressBarTabControl (Partially)MainMenuContextMenuComboBoxDataGridlistBoxlistViewTreeViewDateTimePickerMonthCalendarSplitterTrackBarStatusBarToolBarTreeViewlistViewButtonGroupbox (Partially)
While Visual Studio 2005 supports Visual Theming amongst controls, these controls do not have the “full” theme, which includes the fade effects. This problem can be addressed by setting FlatStyle to System. However, doing this means that images would not be displayed on such controls. This problem can be addressed fairly easily in the next section.
Getting images working on Buttons and other controls
By setting the button‘s FlatStyle to System makes buttons and some other images fail to display on these buttons. But, this section aims to address this problem, by using as little code as possible.
How to get this done? Well, we need to play around with the SendMessage() function found in user32.dll.
First, we would need to declare the function (but first, you will need to import System.Runtime.InteropServices):Hide Copy Code
//Imports the user32.dll
[DllImport("user32.dll", CharSet = CharSet.Auto)]
public static extern IntPtr SendMessage
            (IntPtr hWnd, int msg, int wParam, int lParam);
To set the image of a control, we will need to use the BM_SETIMAGE [0x00F7] message. For now, we would use an icon (Declared in System.Drawing) as an image, as it is easy to get a handle on the icon.Hide Copy Code
const int BM_SETIMAGE = 0x00F7;
private Icon buttonicon;
//Sets the button to use an icon
void SetImage()
{
    IntPtr iconHandle = IntPtr.Zero;

    // Get the icon's handle.
    if (this.buttonicon != null)
    {
        iconHandle = this.Icon.Handle;
    }

    //Sets the icon
    SendMessage(this.button1.Handle, BM_SETIMAGE, 1, (int)iconHandle);
}
What this code does is to retrieve the handle of the icon which you want to display on the button (called “button1“), and sends a message to Windows to set the button to use the icon.
You can set what icon you want by setting “buttonicon“. You can do so by using the following code:Hide Copy Code
buttonicon = new Icon(SystemIcons.Exclamation, 40, 40);
SetImage();
This uses the system’s exclamation icon. What you would get:

If you would want to use a bitmap/image instead of an icon, you can use the GetHIcon() method from the Bitmap to retrieve the bitmap‘s handle and use the handle to set the button‘s image.Hide Copy Code
IntPtr iconhandle = IntPtr.Zero;
Bitmap image = new Bitmap("C:\images\an_image.png");
iconhandle = image_.GetHicon();
SendMessage(this.Handle, VistaConstants.BM_SETIMAGE, 1, (int)iconhandle);
This button still supports the fade effects other normal buttons have.
However, there is one small problem associated with using this method. If this button‘s text is set to “”, no image would be displayed. This problem can be solved by using the createParams() function and assigning the BS_ICON theme to the button.Hide Copy Code
//CreateParams property
protected override CreateParams CreateParams
{
    get
    {
        CreateParams cParams = base.CreateParams;
        if (this.ShowIconOnly == true)
        {
            //Render button without text
            cParams.Style |= 0x00000040; // BS_ICON value
        }
    return cParams;
    }
}
This method is best done from a class which is inherited from button.
CommandLinks
CommandLinks are really just buttons, assigned with a different theme. Their themes and their values (taken from CommCtrl.h in the Windows Vista SDK) are as follows:
BS_COMMANDLINK [0x0000000E]
The first step would be to create a class inherited from button. Then, we can override the CreateParams()function to make the button use the respective theme. For the theme to take effect, you would need to set the button‘s flatstyle to system. Below is the class for the CommandLink:Hide Shrink
Copy Code
using System;
using System.Collections.Generic;
using System.Text;
using System.Windows.Forms;
using System.Runtime.InteropServices

public class CommandLink : Button
{
    const int BS_COMMANDLINK = 0x0000000E;

    //Set button's flatstyle to system
    public CommandLink()
    {
        this.FlatStyle = FlatStyle.System;
    }

    protected override CreateParams CreateParams
    {
        get
        {
            CreateParams cParams = base.CreateParams;
            //Set the button to use Commandlink styles
            cParams.Style |= BS_COMMANDLINK;
            return cParams;
        }
    }
}
You can then build the project and use the component in your Windows Forms just like a normal button (since it is inherited from a normal button). The CommandLink looks like:

*The mouse is over the CommandLink, but PrintScreen would not capture the mouse.
The button supports the fade effects just like the actual controls.
But wait? where’s the CommandLink‘s “note”? Well, we can implement that feature by sending the BCM_SETNOTE[0x00001609] message to Windows. We can incorporate it into a property to set the note of the CommandLinkwith ease.Hide Shrink
Copy Code
const uint BCM_SETNOTE = 0x00001609;
//Imports the user32.dll
[DllImport("user32.dll", CharSet = CharSet.Unicode)]
static extern IntPtr SendMessage
        (HandleRef hWnd, UInt32 Msg, IntPtr wParam, string lParam);
//Note property
private string note_ = "";
public string Note
{
    get
    {
        return this.note_;
    }
    set
    {
        this.note_ = value;
        this.SetNote(this.note_);
    }
}

//Sets the button's note
void SetNote(string NoteText)
{
    //Sets the note
    SendMessage(new HandleRef(this, this.Handle),
                BCM_SETNOTE, IntPtr.Zero, NoteText);
}
You would get:

You can also use the same method for showing icons/images on Buttons for CommandLinks:

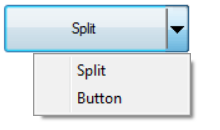
SplitButtons

Just like CommandLinks, SplitButtons are just simply buttons. You can set its style to that of the SplitButton‘s using the CreateParams method:
BS_SPLITBUTTON [0x0000000C]
However, even after setting the style, how are you going to associate a menu (contextmenu) to the button? We can do this by first associating an event which would be fired whenever a person clicks on the “dropdown” on the splitbutton. First, we would listen to all messages sent to the button by overriding the wndproc() method. It happens that the BCN_SETDROPDOWNSTATE [0x1606] message would be sent whenever the dropdown is clicked. This message is fired several times, but only one of the messages happen to be unique, with WPARAMShaving the value of “1“. The filtering of messages is best done within another class. This sample code would fire a custom event (DropDown_Clicked) whenever the dropdown is pushed.Hide Copy Code
protected override void WndProc(ref Message m)
{
    // Listen for operating system messages;
    // Filter out a lot of messages here
    //The dropdown glyph changes:
    //Mousedown (at dropdown area) => Dropdown Event fired
    //                => Glyph changes => MouseUp => Glyph Changes
    switch (m.Msg)
    {
        case (VistaControls.VistaConstants.BCM_SETDROPDOWNSTATE):
        //PROBLEM: other buttons also have would encounter this message
        if (m.HWnd == this.Handle)
        {
            ////This message seems to occur when the drop down is clicked;
            ////Occurs several times, but one of them have the value of 1
            ////in WParams
            if (m.WParam.ToString() == "1")
            {
                DropDown_Clicked();
            }
        }
    break;
    }

    base.WndProc(ref m);
}
Using this custom event, we can show a contextmenu whenever the dropdown part of the button is pressed (full code in the demo). This isn’t all though. We have only assigned an event that would be fired whenever the Dropdown is pushed. We would need to make the dropdown glyph change at the right time. There are a few messages that we can use to achieve the correct painting of the glyphs. They are the WM_PAINT [0x0F], WM_LBUTTONDOWN [0x201], WM_MOUSELEAVE [0x2A3], WM_LBUTTONUP [0x202] and WM_KILLFOCUS [0x08] messages. We can run code whenever these messages are sent by overriding the WndProc() message. (The code is too messy to be placed here, but the full code can be found via the Windows Vista Controls Demo.)
This control also supports the fade-effects.
Cue TextBoxes
Some TextBoxes in Windows Vista hint the user what they should type in (e.g. the search box). It usually appears as some grey text on the text box that would disappear when the user attempts to type things into the textbox. This feature is know as “cue banner”. You can enable this feature on a textbox by using the EM_SETCUEBANNER [0x1501] message.Hide Copy Code
SendMessage(textbox1.Handle, 0x1500 + 1, IntPtr.Zero,
                "Please type in something.");

Mainmenus and Contextmenus
The default MainMenus (or MainMenuStrip) and ContextMenus (or ContextMenuStrip) in Visual Studio 2005 do not fully support the Windows Vista theme:
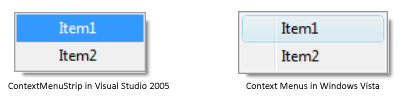
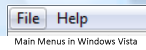
If you want to get the Windows Vista theme on your main menus and context menus, you would need to use the Visual Studio 2003 version, or the backwards compatible version on Visual Studio 2005 (Called “MainMenu” and “ContextMenu“).
You can assign ContextMenus to controls using it’s ContextMenu property (might be hidden in VB.NET in Visual Studio 2005).
Toolbars
While the default toolbars in Visual Studio 2005 do have the Windows Vista look (if the Rendermode is set to System), it does not have all of it. Most toolbars on Windows Vista have the fade effects. To get it, you will need to use the Visual Studio 2003 version or the backwards compatible version on Visual Studio 2005 (and above), and set its Appearance as Flat to get the fade effects.
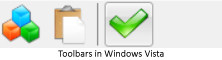
You can use ImageLists on toolbar buttons as well. For Toolbars to use the ImageList properly in Visual Studio 2003, call the applications.DoEvents() function after the application.EnableVisualStyles()function (Bugfix for Application.EnableVisualStyles Bug by Don Kackman).
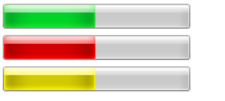
Progressbars
In Windows Vista, progressbars come in different flavors, the most common progressbar being the green one. However, there are also the red and yellow versions as well (there is a blue version, known as a meter, but that is inaccessible). The progressbar colors seem to correspond to specific progressbar states. You can set these states using the PBM_SETSTATE [0x40F] message. The states are PBST_NORMAL [0x0001], PBST_ERROR[0x0002] and PBST_PAUSE [0x0003].Hide Copy Code
SendMessage(progressbar1.Handle, 0x400 + 16, 0x0001, 0); //Normal; Green
SendMessage(progressbar1.Handle, 0x400 + 16, 0x0002, 0); //Error; Red
SendMessage(progressbar1.Handle, 0x400 + 16, 0x0003, 0); //Pause; Yellow
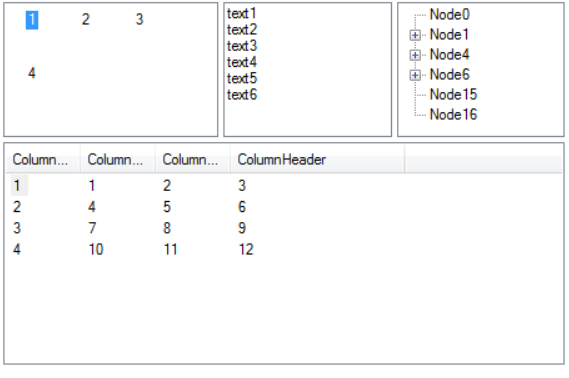
TreeViews and ListViews
By default, TreeViews and ListViews do not have the same look as that of Explorer:
However, with a bit of code, you can make it look like this:
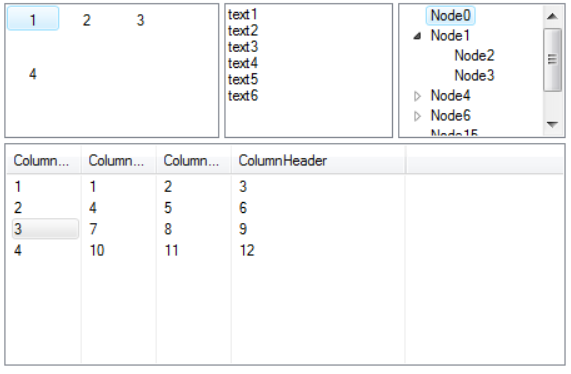
You would need to use the SetWindowTheme() function found in the UXTheme.dll file. You can do this by using the following code:Hide Copy Code
//Imports the UXTheme DLL
[DllImport("uxtheme", CharSet = CharSet.Unicode)]
public extern static Int32 SetWindowTheme
        (IntPtr hWnd, String textSubAppName, String textSubIdList);
Then, you can set the relevant control to use the styles by using the following code:Hide Copy Code
SetWindowTheme(listView1.Handle, "explorer", null);
Where “listView1” is your ListView. You can do this for TreeViews as well.
But there is more. In Windows Explorer, these ListViews have the semi-transparent selection as well. You can do this by calling the LVS_EX_DOUBLEBUFFER [0x00010000] extended style.Hide Copy Code
SendMessage(listview1.Handle, 0x1000 + 54, 0x00010000, 0x00010000);

Treeviews in Windows Explorer also have the fade effects. This can be achieved via the TVS_EX_FADEINOUTEXPANDOS [0x0040] extended style.Hide Copy Code
SendMessage(treeview1.Handle, 0x1100 + 44, 0x0040, 0x0040);
The treeviews also have the “auto-scroll” feature. You can enable this via the TVS_EX_AUTOHSCROLL [0x0020] extended style.Hide Copy Code
SendMessage(treeview1.Handle, 0x1100 + 44, 0x0020, 0x0020);
Points of Interest
There might be several messages or functions that can be used to modify the theme of controls that may not be found in the limited documentation on Windows Vista. Of course, it is kind of unusual that we have to use older versions of controls (like MainMenu and ContextMenu) in order to achieve the full potential of the new Windows Vista graphical user interface.
Things of note
I have not tested the above codes on Visual Studio 2003, nor have I run the application on Windows XP (I didn’t make it backwards compatible “yet”).
Some custom controls in the demo that may not work on legacy Windows versions are the CommandLinks, SplitButtons and ProgressBars.
It was tested in Visual Studio 2005 and Windows Vista.
References
- Application.EnableVisualStyles
- MSDN – Individual Control Information (Browse using the left navigation pane)
History
- Version 1.10: Jun 17 2007 – Several controls added/modified
- Version 1.00: May 20 2007 – Initial
License
This article, along with any associated source code and files, is licensed under The Microsoft Public License (Ms-PL)
About the Author
![图片[18]-Fully themed Windows Vista Controls-第五维](https://secure.gravatar.com/avatar/12de0812ab824c2016a5fd32809e3147.jpg?d=identicon&s=150&r=pg)
| Software Developer |
| Singapore |
My other projects at On